How to Create a Branching Video: Step-by-Step Guide
Build a branching video in Interakly with uploaded scenes, Choice Moments, Routes, learner previews, Launch Check, and a complete path-testing workflow.
A branching video gives a learner a decision, shows what follows from that decision, and carries the learner into the next relevant Scene. The hard part is not drawing several arrows. It is making every option plausible, every consequence instructive, and every valid path complete.
In Interakly, the complete workflow lives in a Pathway. Uploaded video content becomes connected Scenes on a Journey Map. A Choice Moment appears at an authored time inside a Scene, and each option receives a Route to another Scene or an Outcome. This guide builds one small customer-service recovery scenario from plan to launch.
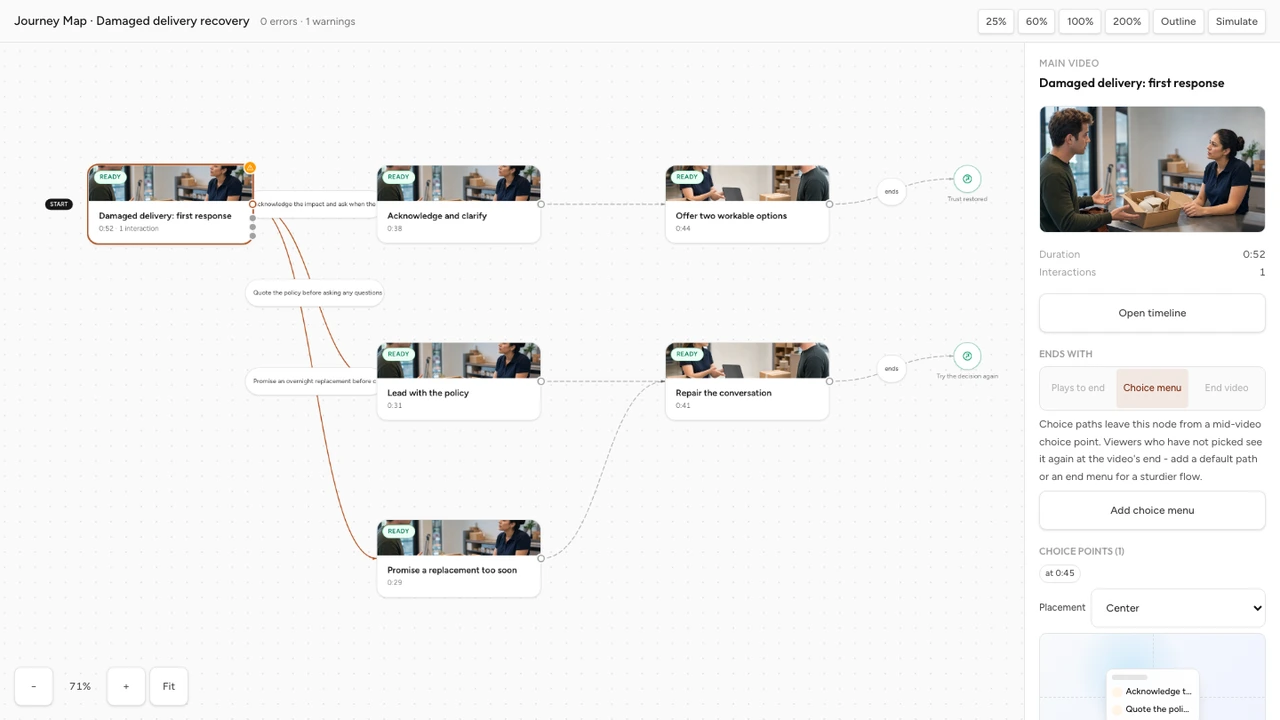
Start with one decision
Begin with a decision that changes what the learner needs to see next. If every option should lead to the same explanation, you probably need a question with feedback rather than a branching route. Branching earns its extra production and testing work when the next Scene depends on the learner's choice, answer, or previously recorded state.
Write the first decision in one sentence:
A customer says an order arrived damaged. What should the representative do before explaining the available resolution?
The intended skill is not remembering a policy sentence. It is handling the conversation in the right order. That gives us two credible actions: acknowledge and clarify the problem, or quote the policy before listening. Both are actions a novice might take, and each deserves a visible response.
Plan the scenario before authoring it
Use the complete branching scenario design framework to define the decision, consequences, convergence, and evidence first.
Map the customer service scenario
Keep the first build small enough to test completely. The customer-service example uses three video Scenes and two successful Outcomes. The weaker opening response does not lead immediately to a red failure screen. It creates friction, shows why the response was weak, and offers a repair route back to the main conversation.
Worked scenario
A damaged-delivery recovery path
The weak choice creates a visible communication problem, then gives the learner a route back to the skill being practised.
Damaged delivery
The customer explains that an order arrived damaged and asks what will happen next.
Decision or destination
Acknowledge and clarify, or quote the policy first
Clarify the desired resolution
The representative confirms whether the customer needs a replacement or refund.
Decision or destination
Arrange a replacement, or explain the refund timeline
Repair the conversation
The customer repeats the concern because the first response did not acknowledge it.
Decision or destination
Acknowledge the impact and return to clarification
Accurate replacement or refund
Both successful endings recap what the learner did and why the response fits the customer's need.
Decision or destination
End the Pathway with a clear result
Build the storyboard before the Studio map
Use the five-view storyboard pack to verify every Scene, option, destination, rejoin, required coverage item, and complete learner walk before producing media.
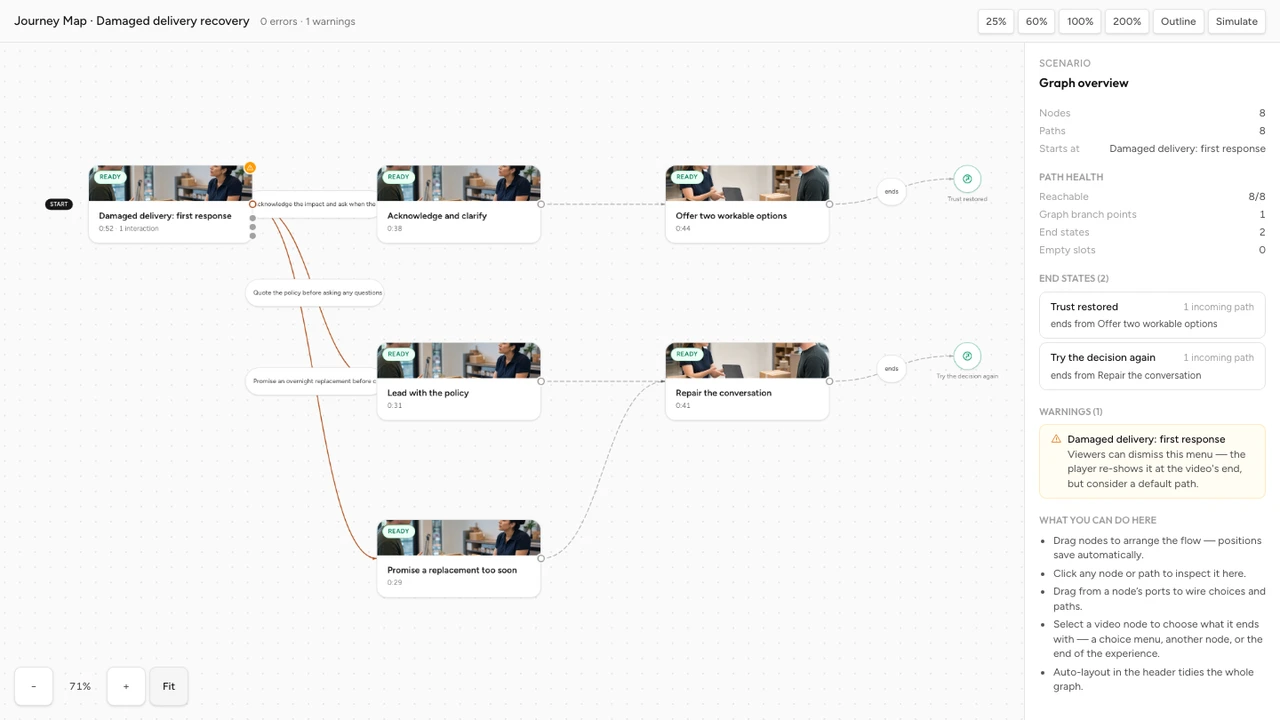
This structure gives the learner a consequence without turning the customer into a prop for punishment. It also avoids filming two copies of every later explanation. Once the learner repairs the conversation, both routes can converge on the same clarification Scene.
Understand the vocabulary
Review how Scenes, choices, consequences, convergence, and Outcomes work together in a branching scenario.
Prepare the uploaded video scenes
Film or edit each Scene so it makes sense at the moment the learner reaches it. Do not begin a consequence clip with a pronoun or camera angle that only makes sense on one route unless that Scene has only one possible entrance.
- Opening Scene: show the damaged-delivery complaint and stop after the customer asks what happens next.
- Clarification Scene: let the customer explain whether a replacement or refund would solve the problem.
- Repair Scene: show the customer repeating the concern, then let the representative acknowledge it and ask the clarifying question.
- Outcome clips or copy: close the replacement and refund paths with the correct next step and a short recap.
Pathway Studio lets a Scene use an existing library video, a direct video upload, or content created and rendered in Composer. Use descriptive file and Scene names such as Damaged delivery opening rather thanClip 1. Clear names reduce routing mistakes later.
Create a Pathway and starting Scene
Open Library, choose Pathways, and create a new Pathway. Start from a blank Journey Map when you already have a route plan, or use the enabled two-choice decision starter for a simple fork. The AI drafting starter is not an available creation path and is not part of this workflow.
Name the Pathway
Use a learner-facing title such as Customer Recovery: Damaged Delivery and describe the skill being practised.
Select the starting Scene
Rename it Damaged delivery and attach the uploaded opening video.
Check the Scene content state
Confirm that the video is attached and playable before adding a decision that depends on it.
Keep the first map simple
Add only the destinations required by the first decision. Expand after that route works.
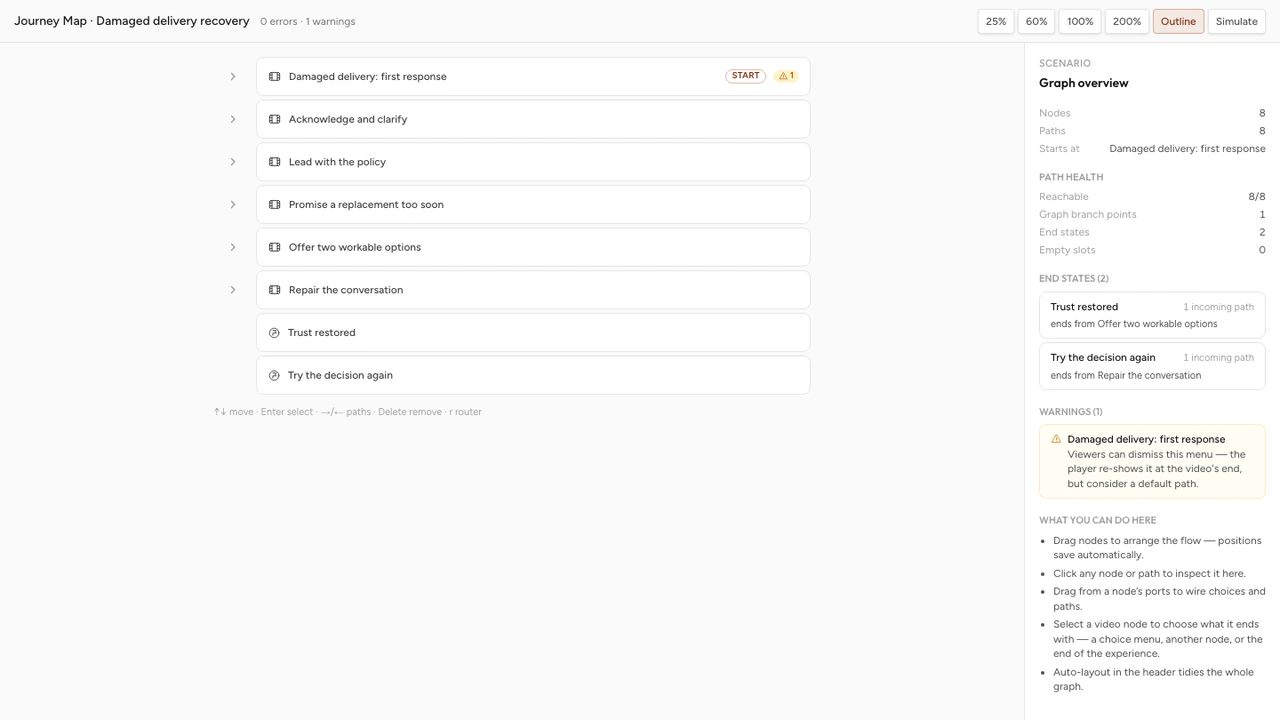
Add the first Choice Moment
In the starting Scene inspector, open Choice Moments and choose Add. Set the exact minute and second after the customer finishes speaking. The choice should not interrupt a sentence or appear before the learner has enough context to decide.
Write the prompt and two options in parallel language:
- Acknowledge the problem and ask what resolution would help.
- Quote the returns policy before asking another question.
Keep the option labels concise. Use the optional descriptions when the learner needs one line of context, not to hide a second decision inside the card. Pathway Studio also provides presentation controls and a learner preview for the Choice Moment. Review the hierarchy at the intended player sizes before wiring Routes.
Write the Choice Moment before wiring it
Build concise options from distinct lines of reasoning, remove wording clues, and check the complete set with a cold reader.
Connect each choice to a destination
Each saved option now needs a destination. Choose New Scene, New Outcome, or an existing destination from the option's Route controls. For this example:
- Route Acknowledge and clarify to the existing Clarify the desired resolution Scene.
- Route Quote the policy first to a new Repair the conversation Scene.
- Give both Routes short labels that remain clear on the Journey Map.
A Route is the connection, not the learner-facing choice itself. Removing a Route removes that connection while leaving the Scenes and their content in the Pathway. Treat an unconnected option as a launch blocker, not as a draft detail to remember later.
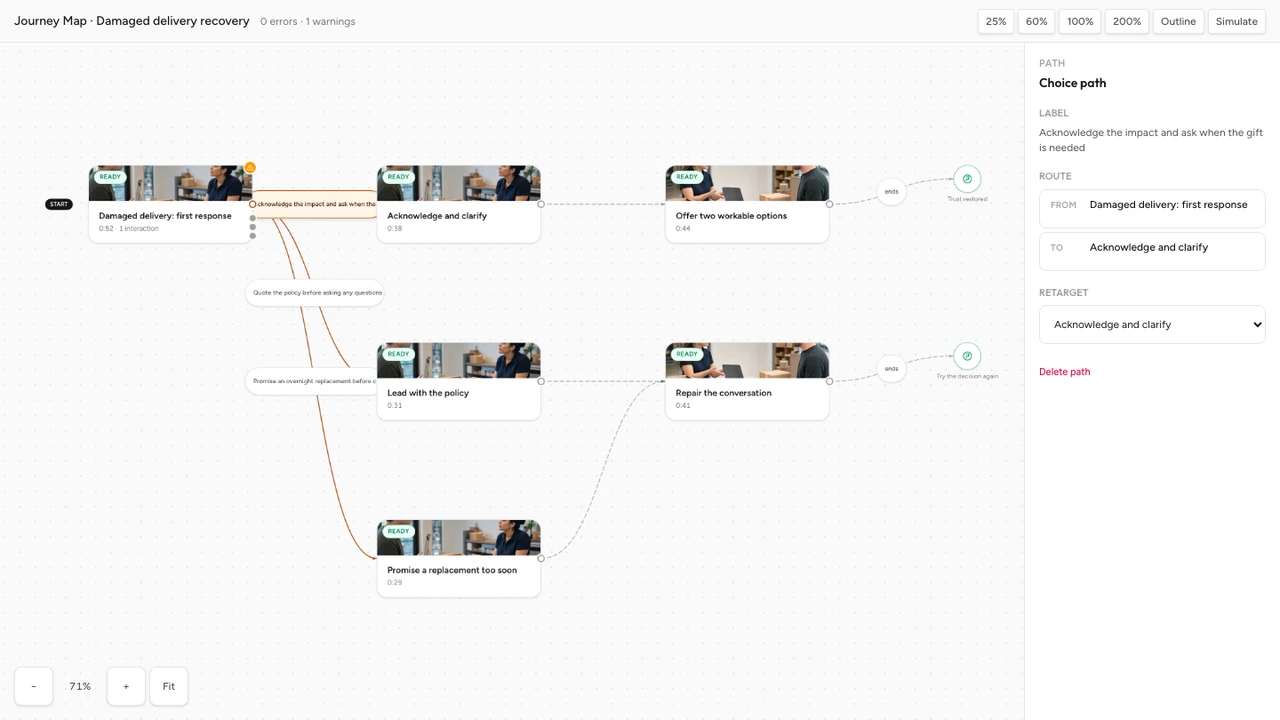
Build consequence and recovery scenes
A useful consequence answers, “What changed because of my choice?” The Repair Scene shows the customer repeating the concern and becoming less confident that the representative is listening. The coaching then names the missing move: acknowledge the impact before moving to policy.
Give the learner a repair action that leads to the Clarification Scene. This route converges only after the learner sees and corrects the problem. It does not pretend both opening choices were equally effective.
In the Clarification Scene, add a second Choice Moment with Arrange a replacement and Explain the refund timeline. Connect each option to its own Outcome. The two endings can share visual style while naming the specific resolution reached.
Make feedback explain the consequence
Use specific evidence and a useful next step instead of a generic correct or incorrect message.
Use Rules only when state should decide
A learner-facing choice and an automatic Rule solve different problems. Use a Choice Moment when the learner should decide. Use a Rule when the Pathway should evaluate saved state, such as a score or variable, and send the learner down the first matching condition Route.
Rule Routes run in priority order, and a default Otherwise Route provides the fallback. The customer-service example does not need a Rule for its first release because every branch is driven by visible learner choices. Do not add conditional logic merely to make the Journey Map look advanced.
Configure the learner view and End Screen
Use the Learner View tool to choose how the Pathway frames the journey, then open End Screen to decide what appears after an Outcome. The end state should make sense for every valid route. If the path contains graded questions, review whether a score belongs in the ending. If it does not, prioritize the reached Outcome and a compact route recap instead.
In this scenario, the final title should name the completed customer resolution, while the message reinforces the conversational sequence: acknowledge, clarify, then explain the correct next step. Enable restart only when trying another path serves the learning purpose.
Test every route in Preview
Pathway Studio Preview shows the starting Scene, the selected Scene's content state, its Choice Moments, and a simulator for following draft destinations. Use it to test both the shortest route and the remediation route. After launch, open the live version and repeat the complete video playback as a learner.
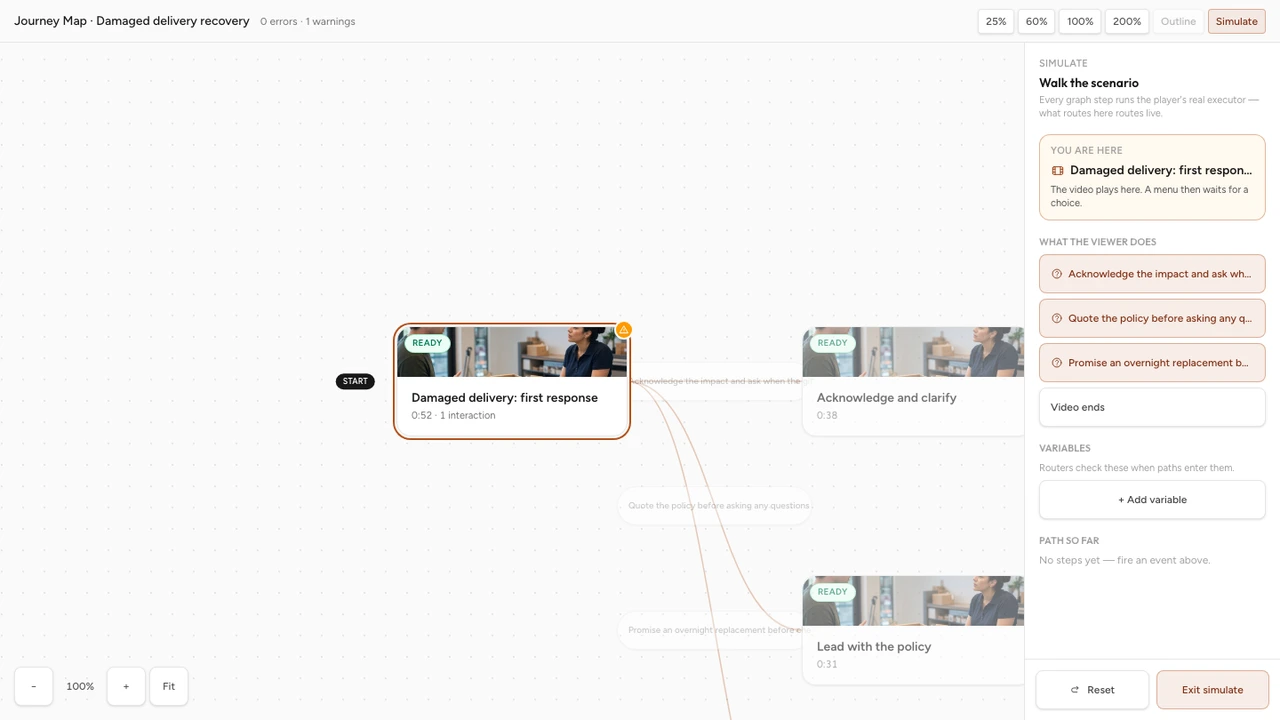
- Take the acknowledge-and-clarify route to both successful Outcomes.
- Take the policy-first route, repair the conversation, and confirm the merge.
- Use Back, restart, and replay behavior where offered by the learner view.
- Inspect Choice Moments in desktop, phone portrait, phone landscape, and the intended embed shape.
- Confirm that no option reveals creator-only words such as Scene, Route, or node.
Review the complete interaction experience
Check timing, writing, feedback, mobile presentation, accessibility, and release quality across the whole video.
Run Launch Check
Open Launch Check after every Scene, Choice Moment, Route, Rule, and Outcome is in place. Blockers must be resolved before first launch or a Journey Map update can be published. Warnings may not prevent launch, but they still deserve a deliberate review because they can expose weak learner polish or incomplete intent.
A successful check is not a substitute for walking every route. Automated validation can find structural problems, while a human route test finds unclear choices, repeated content, jarring cuts, weak consequences, and endings that do not match the path.
Launch and share
When Launch Check passes and the experience has been reviewed, choose Launch. A live learner version is then available from the Pathway share code. The Preview area also exposes embed readiness and responsive iframe options after the published learner payload is ready.
Later Journey Map edits remain drafts until Publish update. Choice Moments belong to shared Scene videos and can affect playback immediately, so Pathway Studio keeps them read-only while the Pathway is live. Unlaunch before changing those interactions, then re-test before launching again.
Common branching video mistakes
- Branching without a changed need: every option leads to the same content and adds navigation without instructional value.
- One obviously correct option: the task tests whether the learner can spot the polite wording rather than make a realistic decision.
- Immediate failure endings: a weak choice ends the lesson before the learner sees, explains, or repairs the consequence.
- Branches that never converge: repeated explanations are filmed several times even when the later learning need is identical.
- Creator language in learner copy: options mention Routes, nodes, Scene numbers, or map structure that learners cannot see.
- Testing only the intended route: a secondary path contains a missing destination, abrupt cut, or incorrect Outcome.
- Treating a YouTube menu as full branching: a compatible Choice Moment overlay is not the uploaded-video segment workflow taught here.
A practical release checklist
Every Scene has content
Open every node and confirm that its uploaded video is attached, playable, and matched to the Scene title.
Every choice has a Route
Check each option in every Choice Moment. A learner should never select an option with no destination.
Every path is understandable
Follow the decision, consequence, feedback, and next step without relying on the map that only the creator can see.
Every terminal path has an Outcome
Give each ending a learner-facing title and a recap that fits the route that reached it.
Every presentation is reviewed
Inspect the Choice Moment at desktop, phone portrait, phone landscape, and the intended embed shape.
Launch Check is clear
Resolve every blocker, review every warning, and repeat the route test after the last structural change.
Keep a route table beside the Journey Map during review. Record each Choice Moment, option, destination, consequence, merge, and Outcome. Mark a row complete only after a reviewer has taken that exact learner path.
Compare branching with lighter interaction patterns
See when a question, info card, hotspot, or other interaction can solve the learning job without a multi-Scene route.
Build a linear interactive video first
Use the standard video workflow when the content should remain in one sequence with questions and feedback along the timeline.
FAQ
What do I need to create a branching video in Interakly?
For the complete branching workflow, prepare uploaded video content for the Scenes in your Pathway. You can upload a video directly to a Scene, attach an existing video from the library, or create and render the Scene in Composer. Then add Choice Moments and connect their options to Scenes or Outcomes on the Journey Map.
Can I create a full branching video from a YouTube video?
No. A YouTube Scene can show compatible Choice Moments as contained overlays, but that is not Interakly's complete uploaded-video segment branching workflow. Full branching scenarios use uploaded video content connected as Scenes in a Pathway.
How many choices should a branching video present at once?
Start with two choices when they represent two genuinely different decisions. Add another option only when it reflects a credible action a learner might take. A short set of distinct choices is easier to understand, test, and connect to meaningful consequences than a menu of slight wording variations.
Does every choice need a separate ending?
No. Routes can diverge for a consequence or coaching Scene and later reconnect when the next learning need is the same. Each valid path should still make the effect of the learner's decision clear, and every terminal path needs an Outcome.
Can I test a branching video before launch?
Yes. Pathway Studio Preview shows the selected Scene, its Choice Moments, and a draft choice simulator so you can inspect destinations before launch. Launch Check identifies blockers and warnings. The complete public learner version becomes available after the Pathway is launched.
What is the difference between a Choice Moment and a Route?
A Choice Moment is the learner-facing prompt and set of options shown during a Scene video. A Route is the Journey Map connection that sends a selected option to its destination Scene or Outcome. Save the choice copy first, then assign and label the Route for each option.
Can I edit Choice Moments after a Pathway is live?
Pathway Studio protects live Choice Moments from direct editing because those interactions belong to the shared Scene video and can affect live playback immediately. Unlaunch the Pathway before changing them, then test and launch the revised experience again. Journey Map draft changes are released with Publish update.
Build a branching video in Pathway Studio
Start with one uploaded-video decision, connect every option, and test each route before launch.
Explore Choice Moment